跨境独立站开店
Creating your first Shopify theme section
If a client wants to customize their store, it's important to provide them with creative means to do so.

If a client wants to customize their store, it's important to provide them with creative means to do so.
*This article contains outdated information due to a 2021 update. While the basic mechanisms of the sections explained in this article remain unchanged, please check the developer's website (in English) for the latest information.
If a client wants to customize their store, it's important to provide them with creative means to do so. The Shopify section provides a powerful tool option for personalizing the site.
Because store customers expect intuitive operation, having the necessary sections (or blocks) placed in the right locations within the store significantly impacts conversions.
Whether you're creating a Shopify theme from scratch or tailoring one for a client, you'll need different types of sections depending on the situation. Using blocks allows merchants to choose and display content wherever they want.
This article will explain how to create various types of theme sections so that clients can customize their stores. We will also look at examples of using two functional blocks to see how to leverage their potential.
What is a theme section?
A section is a module with specific functionality and is a customizable page element. It can be statically included in the theme template (similar to headers and footers) or dynamically added to the theme's homepage by the theme editor.
Create a static section in your Shopify theme
Static sections, as the name suggests, are fixed components that can be customized by the theme editor. The position of this section is locked on the page, and its location is determined by the template. In some ways, it's similar to a snippet, but more powerful! Sections can be added to Liquid templates by using {% section 'header' %} instead of {% include 'my-snippet-file' %}.
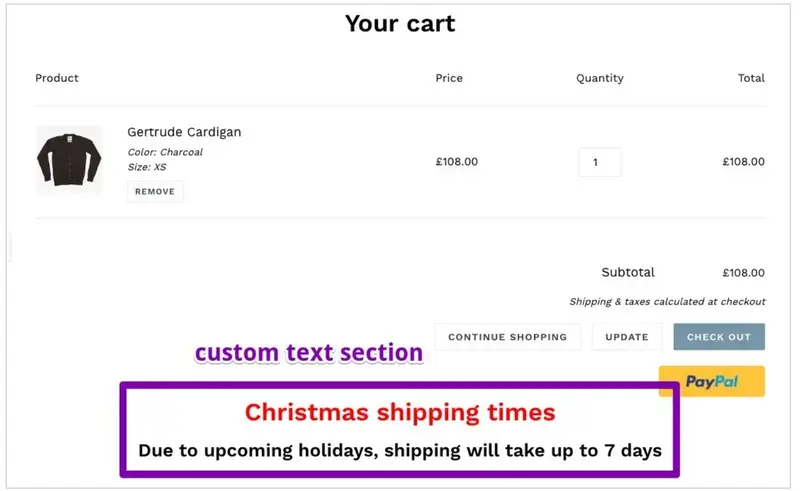
For example, let's say you create a section on the cart page where you can add extra text for your clients. This feature is especially useful for merchants whose shipping periods vary by season, as they can add shipping information and other details.
When you create a new section in the theme file editor, a scaffold is automatically created along with schema, CSS, and JavaScript tags. The schema tag adds JSON that defines how the theme editor reads the content. CSS and JavaScript can be used for section-specific styling and functionality, but by default, the section inherits styles from the theme's main stylesheet.
To add content to a section, simply place HTML and Liquid tags at the top of the file. Liquid tags can be defined in a schema, allowing for customization in the theme editor. Details about the various values you can add to the schema settings can be found in the developer documentation.
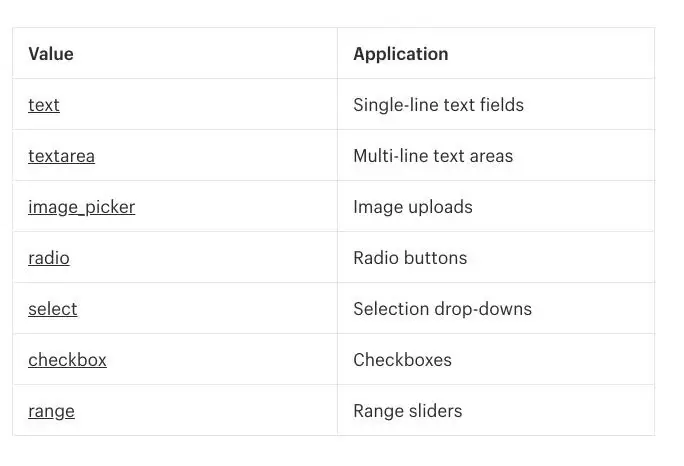
In the example above, we created a section called text.liquid, which contains a custom rich text box and a heading. You can see that the HTML Liquid tag and the settings in the schema match. In this example, we've created a plain text box and a richtext box, but various types of output are possible depending on the client's request. Other valid input types include image_picker, radio, video_url, and font.
In schema configuration, `id` indicates the Liquid tag to be defined, `type` assigns the output to be created, `label` defines the name of this output, and `default` sets a placeholder.
Since we want this text box to appear on the cart page, we add {% section 'text' %} to the cart.liquid template file. This is the same as adding a snippet to a page template.
If you go to the theme editor and navigate to the cart page, you will see this section displayed below the main content of the cart page and above the footer. It will look like this:
Below is the complete code for this section. We recommend experimenting with different styles and section types to choose the best fit for your client's store.
See also: How to use Liquid to create custom landing page templates
Create a dynamic section
Unlike static sections, dynamic sections can be moved to various locations on your homepage. This drag-and-drop functionality gives you a wide range of options for personalizing your store by creating dynamic sections. You can create movable sections for videos, products, image galleries, and more.
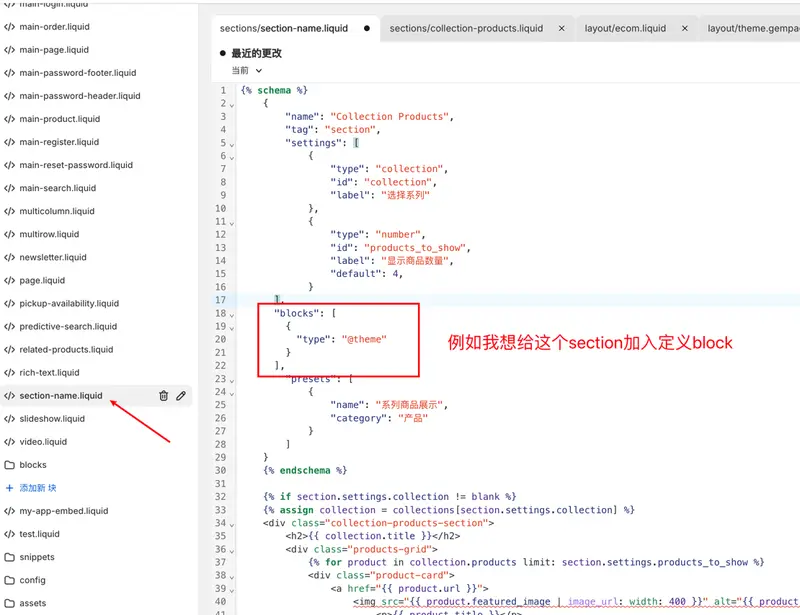
To create dynamic sections, you need to add a preset to the section file. The preset defines how the section will appear in the theme editor and requires a name and a category.
Once a preset is added, the section will automatically be added to the index page. While clicking "Add Section" in the theme editor won't include the preset in the base file, it's easy to add it manually.
As an example, I created a section for a CTA (Call To Action) button. The Liquid tag defines the name (header), url, and text within the schema.
The difference here lies in the last preset part of the schema array. This allows Shopify to automatically recognize it as a dynamic section and add it to the index page. When you add the section to your homepage in the theme editor, it looks like this:
This section can be moved to various locations within the page.
Dynamic sections can be navigated within the index page depending on the output type, giving clients complete control over the appearance of their homepage.
What is a section block?
A block can be thought of as a section within a section. As seen in the example above, sections are navigable within a webpage. The difference between a block and a section is that the elements within a block can move within the section.
There are various types of blocks, and they can be added to sections and their positions can be moved. These operations are performed in the theme editor. Blocks can include images, videos, custom text, or the input setting type options shown below.
This allows clients to move elements within sections without being tied to a specific layout. They can also add elements based on the rules you set. Clients now have even more means of personalizing their ideal store.
Because blocks can be reused, it's important to set limits under appropriate conditions to avoid user interface pitfalls. For example, let's say you're creating a block for video content. A section that allows you to add many video blocks is certainly appealing, but it will affect site loading times and make the page cluttered. Instead, it's wiser to limit it to one video per block. This is a sensible approach from a usability perspective.
Add a block to a dynamic section
Let's add a block of movable CTA buttons to the dynamic section. This should be useful for clients who want to offer their store customers multiple options (e.g., a podcast or an eBook download).
In the following sample, you can see the elements you want to output: the "heading for the entire section" and the "link and link text variables" that make up the block.
As seen in the section, block settings are added to the theme file and defined within schema tags. When using a block, the syntax for this setting (or Liquid variable) will be {{ block.settings.id }}, where the ID is referenced in the schema section.
In this block, you can find the following sections containing links and link text.
Even more importantly, the container is wrapped within a for loop, where each block in section.blocks is processed sequentially. This ensures that the blocks are rendered correctly in the theme editor.
In the schema area of this section file, JSON is used to define individual settings and block values. This has the same meaning as what we saw when creating the section above, but with some additional elements.
In the main schema settings, you can specify the maximum number of blocks within a section. While we've set it to 3 here, any number is possible. Specify block limits or upper limits according to your output type to prevent the page from becoming cluttered.
Below that is a presets area for dynamic sections, which can be added to the index page. By adding blocks to presets, you can define the default number of blocks displayed. In the example above, two CTA buttons will be displayed, but remember that we have set the limit to three. This means that it will be possible to add one more block.
Now, let's see how it looks in the theme editor.
Add a block to the static section
Adding various options to blocks increases the level of customization in web design. This means clients can select multiple blocks within a section and arrange their appearance as they see fit.
This highly flexible approach is especially useful when you want to customize static sections, such as footers. Your clients can add videos, text, images, and more within the same section and change the order of these elements. Without blocks, clients would have had to tinker with the code to make similar changes. But now, all changes can be made in the theme editor.
Using control flow tags to specify layout conditions also allows you to precisely define how blocks will appear when they are added. In this example, the maximum number of blocks is set to 6, and the column width for each block is specified.
The schema allows you to set restrictions at the block level. If a client adds multiple versions of social media icons to the footer, it can confuse store customers. Restricting this specific block to one prevents this. Merchants can adjust where the social media block is placed within a section, but only one version can be included. The following is an example of what happens when this restriction is added:
When all the section files in this footer are displayed, it looks like this:
When this section is included in theme.liquid, it will appear in the theme editor as follows:
Unleash your creativity
We've seen how easy it is to add sections and blocks within a theme. This allows you to add endless options to your client's store. By using presets, you can free up fixed sections and make them move within the page, allowing merchants to freely realize the store they envision while following the direction you provide.
Grow your business with the Shopify Partner Program. Whether you offer marketing, customization, web design, or development services, the Shopify Partner Program will guide you to success. Joining the program is free, offers revenue-sharing opportunities, and provides access to a wealth of tools to grow your business. Join our passionate commerce community today!
read more
- Key points when creating your first Shopify Theme Section
- [How to Use Shopify] Opening an Online Store: Basic Setup
- This guide explains how to set up and specify a domain name for your online shop.
- An overview of Shopify's template language, Liquid.
- Three steps to set up a local Shopify theme development environment
- How to use Shopify with WordPress
- [Must-Read Guide] Introducing Payment Services You Can Use with Shopify
- Shopify Partner Support Information
- A beginner's guide to using Sass with Shopify
FAQ
What is a theme section?
What is a static section?
What is a dynamic section?
Share this article
- Share on Facebook
- Share on X
- Share on LinkedIn