跨境独立站开店
Tools and apps
Two tools recommended for Shopify product selection
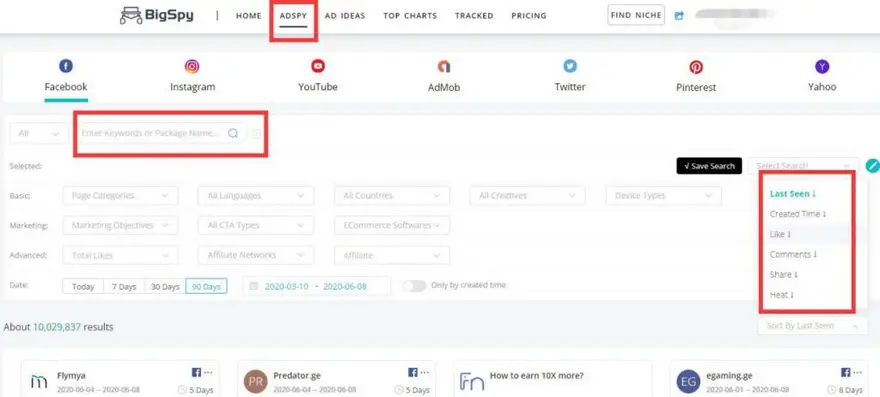
Enter your search keywords, then sort by likes, comments, or shares to find ads with high engagement (over 1000). I entered "shoe" and sorted by comments; shoe-related ads appeared.
Enter your search keywords, then sort by likes, comments, or shares to find ads with high engagement (over 1000). I entered "shoe" and sorted by comments; shoe-related ads appeared.
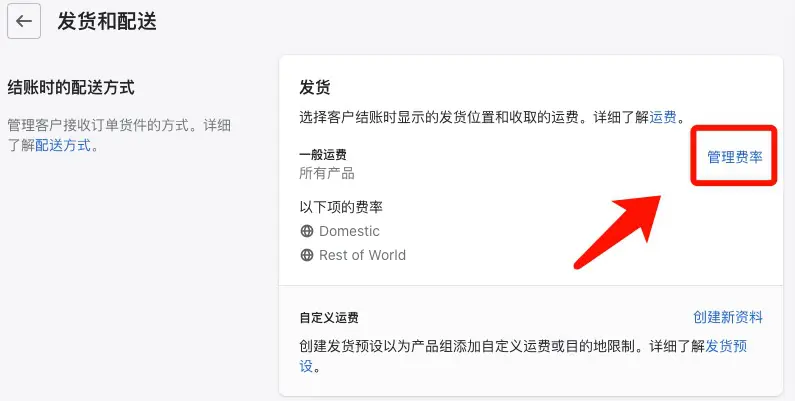
Before configuring shipping fees for your Shopify store, ensure that the currency unit is configured correctly in your Shopify store backend. In the Shopify store backend settings, find Shipping and Delivery, and add shipping regions and shipping settings step by step (including free shipping settings and shipping fees for orders over a certain amount). Shipping costs should be based on order price, not on product weight.
Shopify Backend Basic Function Introduction - Helping you quickly familiarize yourself with Shopify. The Shopify backend has four sections at the top: Shopify account switching, search, alerts, and account management. The left menu includes: Home, Orders, Products, Customers, Analytics, Marketing, Discounts, Sales Channels, Online Store, and Apps. There are also many function introductions in the settings at the bottom left.
Product selection is of paramount importance in the operation of our cross-border independent websites, especially for fast-paced business models like Shopify + Dropshipping.
A step-by-step tutorial on setting up discounts in the Shopify backend: Currently, there are four types of discounts in Shopify stores: Product Discount Amount refers to how to set discounts for individual products; Order Discount Amount refers to how to set discounts for the entire order; Buy X Get Y means that you get a discount on another product when you buy this one; Free Shipping is easy to understand, it means that Shopify store orders do not incur shipping fees.
How do I register an Instagram account and create an Instagram profile? Download the Instagram app from the App Store (or Android app store), complete the registration, tap "Edit Profile," and add your website link and bio (or other URLs).
Before registering for Facebook, you will need the following: a secure internet connection with a stable IP address; a clear, personal photo showing your face; your real phone number or computer (never a shared one); and your real email address (can be a domestic email address). Visit the Facebook website, fill in the required registration information as prompted, and complete the security verification.
12) After adding the campaign, name it and then select the delivery network. Which delivery network to choose is a matter of personal preference; I usually choose the first one.
For cross-border e-commerce, a business email address (or corporate email) is often required, meaning an email address ending with your website's domain name. I'll share a free and user-friendly business email service provider – Zoho Mail. Registration requires a domain name, and I'll then explain the Zoho Mail registration process step-by-step: registration, verification, adding the domain, and adding DNS records – MX and TXT records.
We explained how to find foreigners on Fiverr to help with product selection for your Shopify independent website: register a Fiverr account and search for keywords. We also recommended two excellent product selectors on Fiverr who specialize in Shopify independent website product selection.
This step-by-step tutorial for cross-border sellers to register and join the ShareASale affiliate platform includes 12 steps, including filling in valid contact information, setting the commission rate that the ShareASale merchant is willing to pay, setting the tracking validity period and currency unit, setting affiliate management rules, setting tracking codes, testing tracking codes, and paying the ShareASale membership fee and commission.
If we want to run Facebook ads, we must have a Facebook Page. Log in to Facebook, click the Create button in the upper right corner, then select Page and configure it.
To contact Shopify official customer support: Go to your Shopify admin panel, then click on the "Shopify Help Center" in the top right corner. Find "Contact Shopify Support" or "24/7 Support" in the bottom menu. Log in to your Shopify account, select the topic of your issue, and then choose "Chat with us" or "Continue with English support."
Once you've successfully registered and activated your Stripe account, the next step is to link it to your Shopify admin panel. Log in to your Shopify admin panel, click on Settings in the bottom left corner, then Payments, then Select Provider. Enter your Stripe account's email address and password, and click Submit. Your Stripe account is now successfully linked to your Shopify store admin panel.
Link your 2Checkout account to your Shopify admin panel: Log in to your Shopify admin panel, click Settings in the bottom left corner - Payments - Providers, and find 2Checkout. Then log in to your 2Checkout admin panel, find the merchant code and secret word, and copy and paste them into the corresponding boxes in the Shopify admin panel from the previous step.
10 Tips for Facebook Ads for Independent E-commerce Sellers: Optimize ad targeting to shopping; Utilize Ad Group Budget (ABO) and Campaign Budget (CBO); Give Facebook ads more time; Test single interests; Good clicks but too few orders; Test only one variable at a time; Create ad creatives and try different angles; Continuously test; Aim to increase order value; Keep learning!